
Xây dựng quy trình tự động triển khai ứng dụng CICD với Agro Rollouts
Kiến thức nền tảng
- Docker
- Kubernetes
- CI/CD
Có rất nhiều mô hình triển khai build và deploy ứng dụng tự động hoặc bán tự động thông qua quy trình CI và CD.
Giới hạn trong bài viết này mình trình bày việc triển khai CI bằng GitHub Actions và CD ứng dụng thông qua Argo Rollouts trển khai app theo chiến lược Blue/Green lên các môi trường.
Ghi chú: Agro Rollouts còn có chiến lược Canary mọi người có thề tìm hiểu thêm tại https://argoproj.github.io/rollouts/
Luồng nghiệp vụ cho việc triển khai là
- GitHub Action ở CI sẽ thực hiện việc chạy Build/Test/Security sau đó sẽ thực đóng gói app thành image thông qua Dockerfile, sau đó sẽ được đẩy lên một Container Registry (có thể sử dụng GitHub hoặc Docker hoặc có thể đẩy lên một custom CR)
- GitHub Action ở CD sẽ áp dung (apply) một Argo Rollout để ứng có thể được deploy lên namespace của cụm Kubernetes
Trước khi đi vào phân tích từng bước chi tiết ta có thể xem thêm bài dưới đây nói về việc đóng gói một ứng dụng bằng Dockerfile
Sau đây ra sẽ xem một ví dụ cụ thể khi triển khai code từ nhánh dev (GitHub) lên môi trường dev của ứng dụng.
CI với GitHub Action, ta xem một file YAML đơn giản sau
Đây là ứng dụng Spring Boot chạy trên JDK 21
name: Build and Publish Docker image (Dev)

on:
  push:
    branches:
      - 'dev'

jobs:
  build-and-push:
    runs-on: ubuntu-latest

    steps:
      - name: Checkout code
        uses: actions/checkout@v4

      - name: Make gradlew executable
        run: chmod +x ./gradlew

      - name: Show current branch and commit
        run: |
          git rev-parse --abbrev-ref HEAD
          git log -1

      - name: Set up JDK 21
        uses: actions/setup-java@v4
        with:
          distribution: temurin
          java-version: 21

      - name: Set up environment variables for Gradle
        run: |
          echo "USERNAME=${{ secrets.GPR_USER }}" >> $GITHUB_ENV
          echo "TOKEN=${{ secrets.GPR_KEY }}" >> $GITHUB_ENV

      - name: Build JAR with Gradle
        run: ./gradlew build --no-daemon -x test

      - name: Set up Docker Buildx
        uses: docker/setup-buildx-action@v3

      - name: Log in to GitHub Container Registry
        uses: docker/login-action@v3
        with:
          registry: ghcr.io
          username: ${{ github.actor }}
          password: ${{ secrets.GH_PACKAGES_TOKEN }}

      - name: Build and push Docker image (Dev)
        uses: docker/build-push-action@v5
        with:
          context: .
          file: Dockerfile
          push: true
          tags: |
            ghcr.io/abcproject/ai-service:dev-latest
ghcr.io/abcproject/ai-service:dev-${{ github.run_number }}Các bước thường thấy tại CI
- Kiểm tra điều kiện khởi chạy (nhánh dev có thay đổi)
- Thiết lập môi trường
- Build/Test/Security
- Tạo image từ Dockerfile và đẩy lên Container Registry (CR)
Tại đây sau khi bước tạo ảnh, đẩy file lên CR ta kích hoạt giai đoạn (stage) tiếp theo CD
name: Deploy with Argo Rollouts (Dev Environment)

on:
  workflow_run:
    workflows: ["Build and Publish Docker image (Dev)"]
    types:
      - completed

jobs:
  deploy:
    runs-on: ubuntu-latest
    if: ${{ github.event.workflow_run.conclusion == 'success' }}

    steps:
      - name: Checkout code
        uses: actions/checkout@v4
        with:
          ref: ${{ github.event.workflow_run.head_branch }}
          repository: ${{ github.event.workflow_run.head_repository.full_name }}

      - name: Show current branch and commit
        run: |
          git rev-parse --abbrev-ref HEAD
          git log -1

      - name: Set up Kubernetes config
        run: |
          mkdir -p $HOME/.kube
          echo "${{ secrets.KUBECONFIG_DEV }}" > $HOME/.kube/config

      - name: Update image in Rollout manifest
        env:
          BUILD_NUMBER: ${{ github.event.workflow_run.run_number }}          #want to print log build number

        run: |
          echo "Build number  is: ${BUILD_NUMBER} "
          sed -i "s|image: ghcr.io/abcproject/ai-service:.*|image: ghcr.io/abcproject/ai-service:dev-${BUILD_NUMBER}|" k8s/ai-rollout-dev.yaml

      - name: Apply updated Rollout
run: kubectl apply -f k8s/ai-rollout-dev.yamlTại CD sẽ thực hiện các bước sau
- Điều kiện khởi chạy, bước [Build and Publish Docker image (Dev)] chạy thành công
- Thiết lập cấu hình cho kubectl
- Cập nhật Build Number cho image trên CR để đảm bảo bản deploy là mới nhất
- Apply Agro Rollouts Service lên Kubernetes, tại đây quy trình CD sẽ được diễn ra
Ta phân tích xem Agro CD hoạt động như thế nào
apiVersion: argoproj.io/v1alpha1
kind: Rollout
metadata:
  name: etask-ai
  namespace: etask  # Change to prod for production
spec:
  replicas: 1
  revisionHistoryLimit: 2
  selector:
    matchLabels:
      app: etask-ai
  template:
    metadata:
      labels:
        app: etask-ai
    spec:
      imagePullSecrets:
        - name: github-registry-secret
      containers:
        - name: etask-ai
          image: ghcr.io/abcproject:dev-${BUILD_NUMBER}
          ports:
            - containerPort: 8080
          livenessProbe:
            httpGet:
              path: /actuator/health/liveness
              port: 8080
            initialDelaySeconds: 45
            periodSeconds: 10
          readinessProbe:
            httpGet:
              path: /actuator/health/readiness
              port: 8080
            initialDelaySeconds: 45
            periodSeconds: 5
          env:
            - name: SPRING_PROFILES_ACTIVE
              value: cloud  # Change to prod for production
          resources:
            requests:
              memory: "8Gi"
              cpu: "4"
            limits:
              memory: "16Gi"
              cpu: "4"
  strategy:
    blueGreen:
      activeService: ai-active
      previewService: ai-preview
      autoPromotionEnabled: true
previewReplicaCount: 1Phân tích một Argo Rollout YAML ta sẽ thấy rõ việc deploy được hoạt động như thế nào
metadata.name: etask-ai
Định danh cho mỗi Agro CD theo từng service, nó là duy nhất trên mỗi namespace, ta dùng tên này khi muốn theo dõi trạng thái deploy của một ứng dụng
spec.selector.matchLabels: app: etask-ai
Đây là các Pod name sẽ được quản lý bởi Rollout
spec.template.metadata.labels: app: etask-ai
Nhãn được gán vào Pods được tạo bởi Rollout
spec.replicas: 1
Chỉ định Pod sẽ chạy trên bao nhiêu biến thể (instance)
Tiếp theo là cấu hình các địa chỉ của image trên CR
spec.template.spec.containers.image
Tiếp đến là cấu hình port, cấu hình endpoint cho kiểm tra liveness và readiness
Tiếp đến là các cấu hình về giá trị của biến môi trường
Các biến môi trường có thể được lưu tại secret của Kubernetes, hoạt thiết lập trực tiếp tại YAML file
Các tham số về cấu hình cho mỗi Pod
strategy.blueGreen
Ta sẽ dùng chiến lược B/G để deploy app
B/G sẽ cần hai service
- active để đảm bảo luôn có một service hoạt động
- preview là môi trường chuẩn bị, service này sẽ được kết nối vào Pod sau khi deploy mới, và sẽ thực hiện kiểm tra liveness và readiness, nếu thành công sẽ chuyển service này thành active và kết thúc hoạt động của Pod ở service active trước đó
- autoPromotionEnabled cấu hình chuyển tự động hoặc thủ công
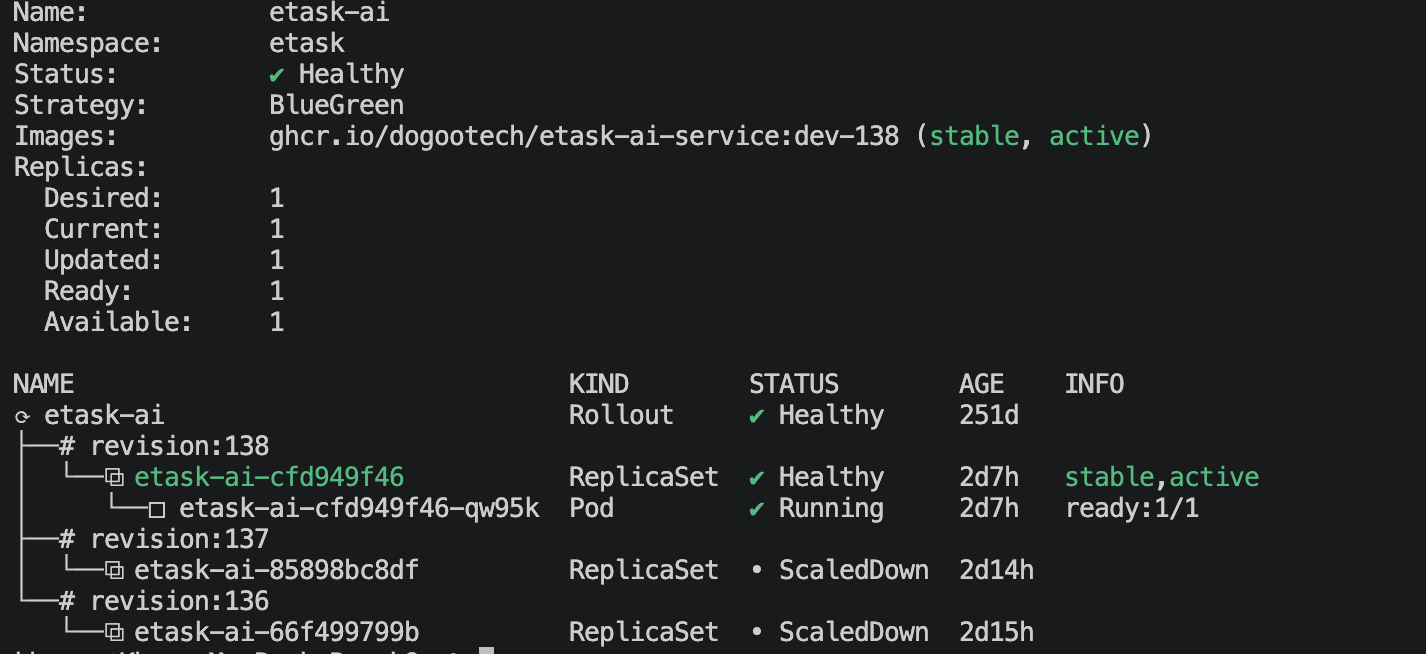
Thông thường một Agro Rollouts sẽ hoạt động tự động hoàn toàn, trong một số bất thường ta có thể sử dụng câu lệnh để kiểm tra
Lệnh xem chi tiết các Rollouts deploy
kubectl argo rollouts get rollout gateway -n dev
Name:            gateway
Namespace:       dev
Status:          ✔ Healthy
Strategy:        BlueGreen
Images:          ghcr.io/dogootech/gateway-service:dev-40 (stable, active)
Replicas:
  Desired:       1
  Current:       1
  Updated:       1
  Ready:         1
  Available:     1

NAME                                 KIND        STATUS        AGE  INFO
⟳ gateway                            Rollout     ✔ Healthy     37m
├──# revision:4
│  └──⧉ gateway-797849f56b           ReplicaSet  ✔ Healthy     17m  stable,active
│     └──□ gateway-797849f56b-9k24g  Pod         ✔ Running     17m  ready:1/1
├──# revision:3
│  └──⧉ gateway-569f766c4b           ReplicaSet  • ScaledDown  19m
└──# revision:2
└──⧉ gateway-7cbcd495bc ReplicaSet • ScaledDown 22mLệnh xem trạng thái Rollouts
kubectl argo rollouts status gateway -n devĐầu ra thể hiện Heathly hoặc UnHeathly
Promote a rollout after verification:
kubectl argo rollouts promote gateway -n devTo abort/rollback:
kubectl argo rollouts abort gateway -n devReload/Restart a rollout:
# Restart the rollout (triggers a new deployment)
kubectl argo rollouts restart gateway -n dev

# Alternative: Add annotation to force restart
kubectl patch rollout gateway -n dev -p '{"spec":{"restartAt":"'$(date +%s)'"}}'

# Rollback to previous revision
kubectl argo rollouts undo gateway -n dev

# Rollback to specific revision
kubectl argo rollouts undo gateway --to-revision=40 -n dev
Visual Dashboard:
kubectl argo rollouts dashboard
Bài viết đã giới thiệu tổng quan cách trển khai Agro Rollout cho một ứng ứng dụng cụ thể Spring Boot, ta có thể áp dụng tương tự cho các service khác.
Hy vọng bài viết sẽ giúp ích cho các bạn!

Để lại một bình luận