Triển khai Gateway pattern

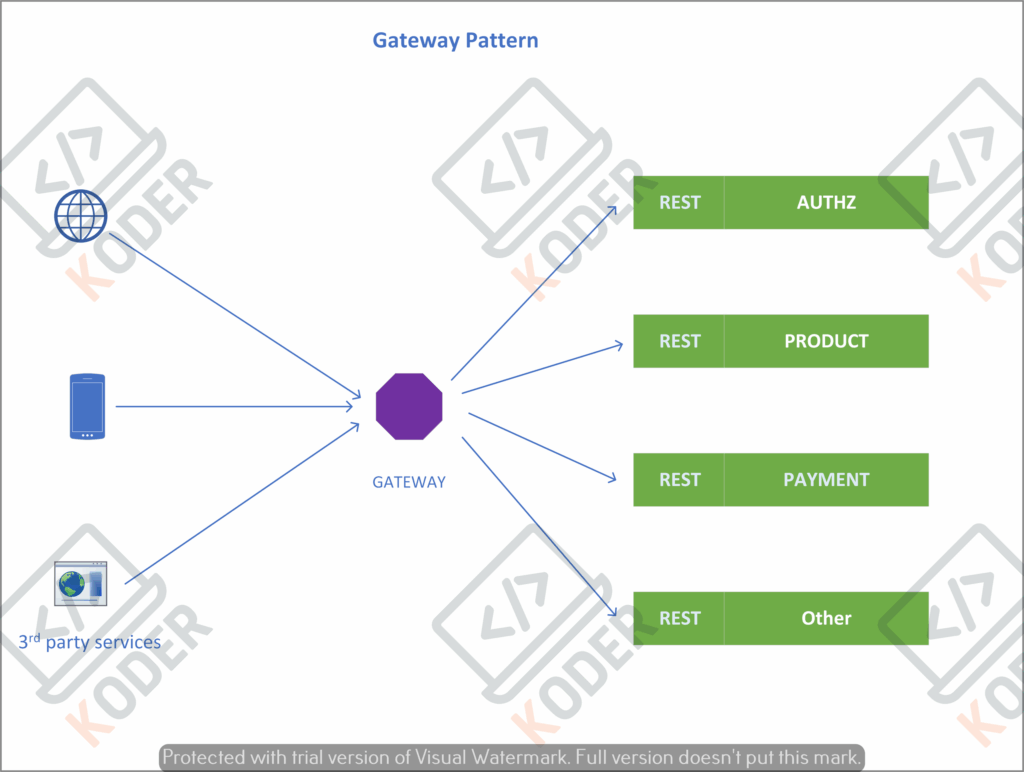
Gateway pattern với ý tưởng sử dụng một Service đứng trước tiếp nhận các request, thực hiện một số các nghiệp vụ như: rewrite-url, xác thực, rate limit, v.v… trước khi chuyển tiếp request vào các dịch vụ phía sau.

Ta có thể hình dung Nginx cũng là một dạng triển khai cho mô hình này, trong các dự án triển khai Microservice trên Spring Boot, nó có đưa ra một giải phải pháp là sử dụng Gateway Service nằm trong gói Spring Cloud.
Gateway Service trong Spring Cloud có 2 kiểu để bạn lựa chọn là
- Gateway Service Web
- Gateway Service Reactive (WebFlux)
Trong bài viết này mình sẽ giới thiệu về kiểu sử dụng Gateway Service Reactive (sau đây gọi tắt là GW),
GW sẽ đảm nhiệm các chức năng sau
- xác thực JWT
- ratelimit cho từng service
- CircuitBreaker đoản mạch và fallback
- rewrite path
Các thiết lập căn bản
Cấu hình cho Gateway service chạy ở chế độ reactive
implementation 'org.springframework.boot:spring-boot-starter-webflux'
implementation 'org.springframework.cloud:spring-cloud-starter-gateway-server-webflux'Sử dụng Spring Security, dùng cho xác thực JWT token
implementation 'org.springframework.boot:spring-boot-starter-security'
implementation 'org.springframework.boot:spring-boot-starter-oauth2-resource-server'
implementation 'org.springframework.security:spring-security-oauth2-jose'Sử dụng circuitbreaker ngắt kết nối và trả về giá trị mặc định
implementation 'org.springframework.cloud:spring-cloud-starter-circuitbreaker-reactor-resilience4j'
Sử dụng redis cho ratelimit, lưu ý khi Gateway Service sử dụng reactive thì database cũng cần chạy ở chế độ reactive
implementation 'org.springframework.boot:spring-boot-starter-data-redis-reactive'Sử dụng Gateway cho xác thực
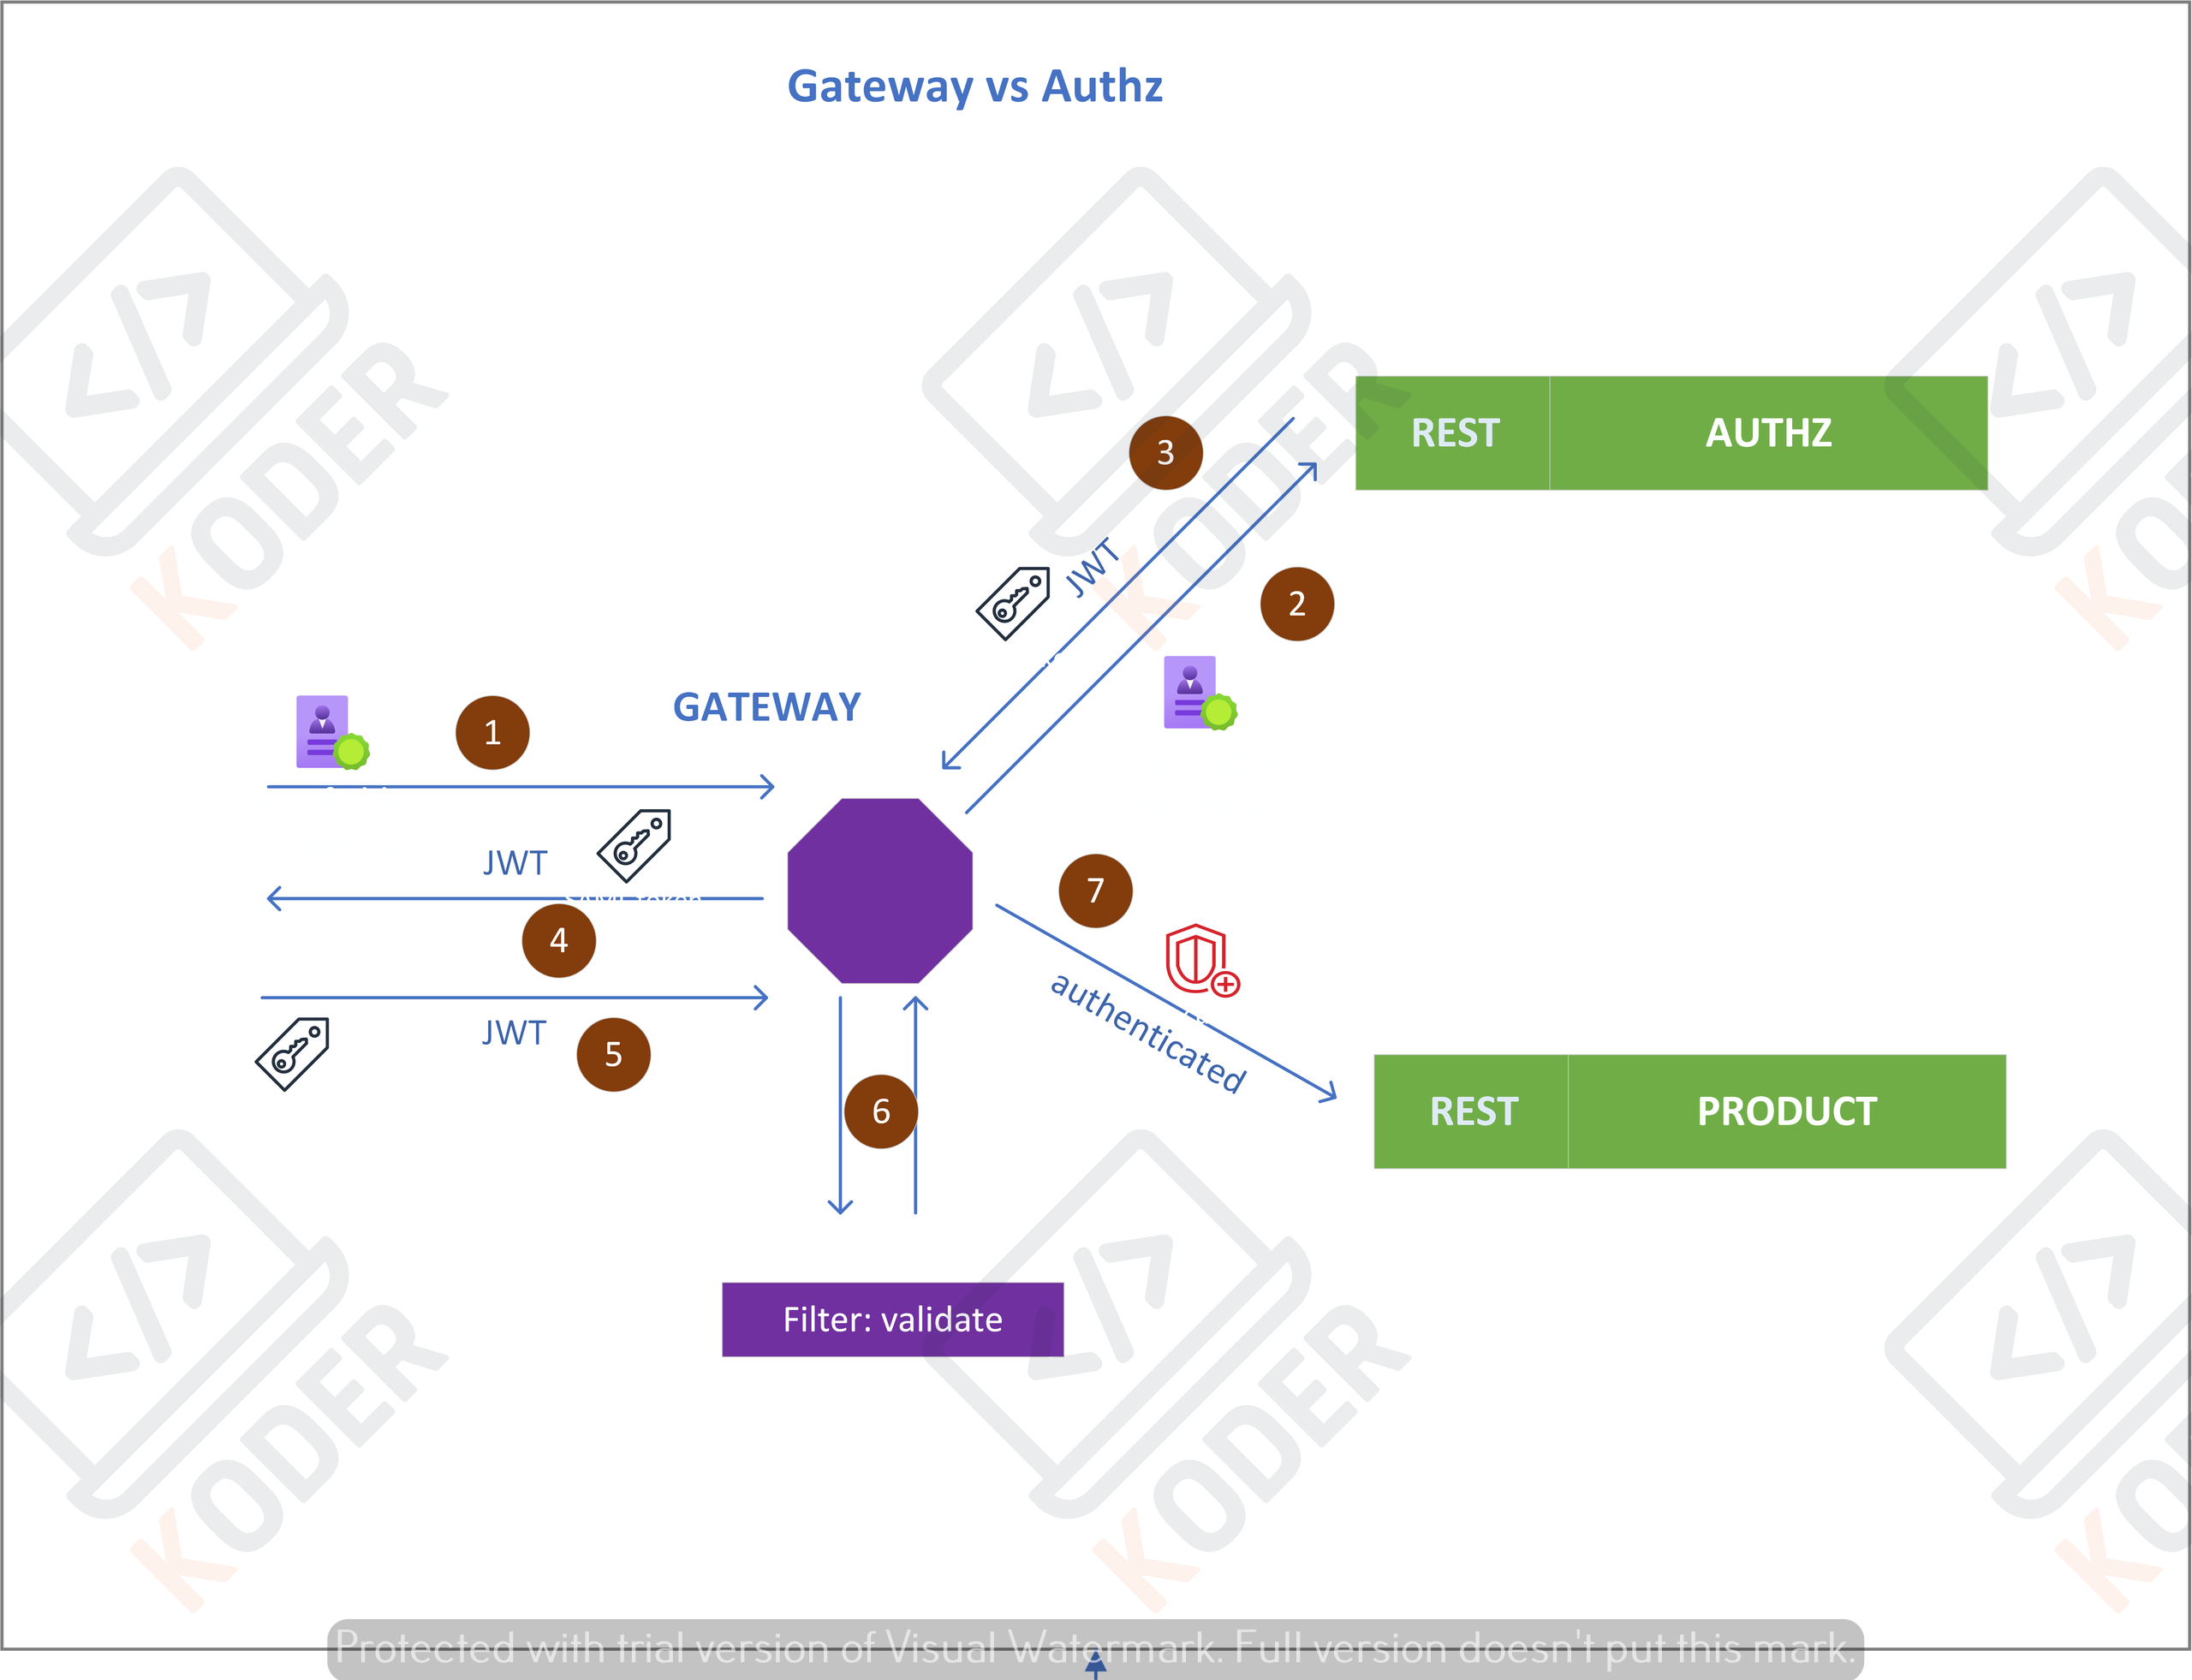
Giả sử ta có authz-service dùng để đăng nhập và trả về JWT token nếu đăng nhập thành công, product-service là một domain service, khi truy cập vào service này người dùng cần xác thực.
Mô hình tổng quan

(1) Login: người dùng gọi API login với user/pass, gọi đến Authz service, API đi qua Gateway, đây là API Login do vậy không cần xác thực ta cần cấu hình cho bypass tại gateway
@Bean
public SecurityWebFilterChain securityWebFilterChain(
        ServerHttpSecurity http,
        ReactiveJwtDecoder jwtDecoder) {
    return http
            .cors(corsSpec -> {})
            .csrf(ServerHttpSecurity.CsrfSpec::disable)
            .authorizeExchange(exchanges -> exchanges
                    .pathMatchers(
                            "/api/authz/token",
                            "/api/authz/signup",
                            "/api/authz/refresh-token",
                            "/api/authz/logout",
                            "/openapi/swagger-ui.html",
                            "/openapi/swagger-ui/**",
                            "/openapi/v3/api-docs/**",
                            "/actuator/health/liveness",
                            "/actuator/health/readiness",
                            "/.well-known/acme-challenge/**"
                    ).permitAll()
                    .pathMatchers(org.springframework.http.HttpMethod.OPTIONS, "/**").permitAll() // Allow preflight
                    .anyExchange().authenticated()
            )
            .oauth2ResourceServer(oauth2 -> oauth2.jwt(
                    jwt -> jwt.jwtDecoder(jwtDecoder)))
            .addFilterAt(new JwtCookieAuthenticationFilter(jwtDecoder), SecurityWebFiltersOrder.AUTHENTICATION)
            .build();
}(2) Xác thực, tại authz-service, sẽ tiến hành xác thực tài khoản, nếu đúng user/pass hoặc SSO qua OAuth2, nó sẽ trả về JWT token (3) và (4), thông thường sẽ trả về qua cookies với secured và http-only
Thông thường sẽ trả về cặp JWT token và refresh token qua secured cookies và HTTP-Only
(5) JWT token được gửi đi trong header (cookies), khi gọi đến API thuộc Product service, tại đây khi đi qua Gateway nó sẽ kiểm tra
Tại file cấu hình trên ta để ý đến các cấu hình sau
@Bean
public ReactiveJwtDecoder jwtDecoder(@Value("${app.jwt.public-key}") RSAPublicKey publicKey) {
    return NimbusReactiveJwtDecoder.withPublicKey(publicKey).build();
}và
.oauth2ResourceServer(oauth2 -> oauth2.jwt(
jwt -> jwt.jwtDecoder(jwtDecoder)))tại đây ta định nghĩa một Bean cho ReactiveJwtDecoder với publickey và cấu hình oauth2ResourceServer cho Gateway (khi này Gateway như một Resource Server cho OAuth2.0), public-key này phải giống với public-key tại authz-service (module cung cấp JWT token).
(6) đây là đoạn cấu hình của filter, cho phép xác thực thông qua cookie.
.addFilterAt(new JwtCookieAuthenticationFilter(jwtDecoder), SecurityWebFiltersOrder.AUTHENTICATION)Như phần login API có trả về cookie so vậy khi điều kiện domain thỏa mãn, cookie sẽ được tự động gửi kèm qua API, nó sẽ được tách lấy ra, xác thực, tách được userId và gửi vào header, sau đó forward vào các service đằng sau gateway.
public class JwtCookieAuthenticationFilter implements WebFilter {

    private final ReactiveJwtDecoder jwtDecoder;

    public JwtCookieAuthenticationFilter(ReactiveJwtDecoder jwtDecoder) {
        this.jwtDecoder = jwtDecoder;
    }

    @Override
    public Mono<Void> filter(ServerWebExchange exchange, WebFilterChain chain) {
        return Mono.justOrEmpty(exchange.getRequest().getCookies().getFirst("access_token"))
                .map(HttpCookie::getValue)
                .flatMap(token ->
                        jwtDecoder.decode(token)
                                .map(jwt -> {
                                    Object sub = jwt.getClaims().get("sub");
                                    String userId = sub != null ? sub.toString() : "";
                                    return exchange.mutate()
                                            .request(request -> request.headers(headers -> {
                                                headers.setBearerAuth(token);
                                                headers.add("X-USER-ID", userId);
                                            }))
                                            .build();
                                })
                )
                .defaultIfEmpty(exchange)
                .flatMap(chain::filter);
    }

}(7) khi hàm jwtDecoder.decode(token) xác định token còn hạn, tương đương với việc người dùng được xác thực, Gateway sẽ cho token đi tiếp vào các service bên trong như Product service
RateLimit
Khi bật kết nối rate-limit ta cần cầu hình Gateway app kết nối đến redis như đã giới thiệu trong phần đấu, với kết nối đến redis có dùng password và SSL thì cấu hình sẽ cần thêm tạo file cấu hình
@Bean
public LettuceConnectionFactory redisConnectionFactory() throws IOException {
    RedisStandaloneConfiguration redisStandaloneConfiguration = new RedisStandaloneConfiguration();
    redisStandaloneConfiguration.setHostName(host);
    redisStandaloneConfiguration.setPort(port); // Or your SSL port, usually 6380 or custom
    redisStandaloneConfiguration.setPassword(password); // If your Redis requires authentication
    redisStandaloneConfiguration.setUsername(username);

    LettuceClientConfiguration.LettuceClientConfigurationBuilder lettuceClientConfigurationBuilder = LettuceClientConfiguration.builder();

    // Enable SSL
    lettuceClientConfigurationBuilder.useSsl();

     SslOptions sslOptions = SslOptions.builder()
             .trustManager(resourceLoader.getResource("classpath:redis.crt").getFile())
             .build();

     ClientOptions clientOptions = ClientOptions.builder()
             .sslOptions(sslOptions)
             .build();

     lettuceClientConfigurationBuilder.clientOptions(clientOptions);

    LettuceClientConfiguration lettuceClientConfiguration = lettuceClientConfigurationBuilder.build();

    return new LettuceConnectionFactory(redisStandaloneConfiguration, lettuceClientConfiguration);
}Với mỗi loại service khác nhau thì cần thông số rate-limit khác nhau, ta có thể cấu hình 1 thông số chung, và các thông số riêng cho từng dịch vụ. Thông số ratelimit ở đây là
@Bean
@Primary  // This will be the default bean
public RedisRateLimiter defaultRateLimiter() {
    return new RedisRateLimiter(10, 20);  // Default rate limiting
}10 là số token được thêm vào 1 bucket trên 1 giây 20 là số token tối đa một bucket có thể chứa
Vậy 1 bucket ở đây được thể hiện cho một user hoặc một api key, vậy với những API không biết được userId thì ta cần xử lý như nào?
@Bean
public KeyResolver userKeyResolver() {
    return exchange -> {
        // Try to get user ID from header (set by your JwtCookieAuthenticationFilter)
        String userId = exchange.getRequest().getHeaders().getFirst("X-USER-ID");

        // If user ID is available, use it as the rate limit key
        if (userId != null && !userId.isEmpty()) {
            return Mono.just("user:" + userId);
        }

        // Fallback to IP address for unauthenticated requests
        String ip = exchange.getRequest().getRemoteAddress() != null ?
                exchange.getRequest().getRemoteAddress().getAddress().getHostAddress() : "unknown";
        return Mono.just("ip:" + ip);
    };
}Là cấu hình KeyResolver cho phép xác định nếu không tìm được userId thì sẽ chuyển sác định bởi IP request.
Sau khi cài đặt tham số cần thiết, ta cầu hình vào Gateway
.route("authz-service", r -> r
                        .path("/api/authz/token", "/api/authz/logout", "/api/authz/refresh-token", "/api/authz/signup")
                        .filters(f -> f
                                .rewritePath("/api/authz/(?<segment>token|logout|refresh-token|signup)", "/api/v1/${segment}")
                                .requestRateLimiter(config -> config
                                        .setRateLimiter(authServiceLimiter)
                                        .setKeyResolver(userKeyResolver)
                                        .setStatusCode(org.springframework.http.HttpStatus.TOO_MANY_REQUESTS)
                                )
                        )
                        .uri(authzEndpoint)
)ví dụ như trên, cho các API liên quan đến đăng nhập ta cấu hình authServiceLimiter, userKeyResolver và mã lỗi trả về nếu có limit
CircuitBreaker đoản mạch và fallback
Khi triển khai dưới dạng microservice, trong trường hợp các service bên trong bị lỗi ta cần triển khai cơ chế đoản mạch để ngắt kết nối tạm thời vào service đó đồng thời đưa ra giá trị trả về khi service bị lỗi.
Cấu hình các thư viện cần thiết trong phần đâu, ngoài ra ta cần cấu hình các tham số hoạt động trong file thuộc tính của Spring Boot (application.yaml/application.properties)
# Circuit breaker configuration
resilience4j.circuitbreaker.instances.productServiceCircuitBreaker.failure-rate-threshold: 50
resilience4j.circuitbreaker.instances.productServiceCircuitBreaker.wait-duration-in-open-state: 10000

resilience4j:
  timelimiter:
    instances:
      productServiceCircuitBreaker:
        timeoutDuration: 10s # Increase as needed
cancelRunningFuture: trueĐây là cấu hình cho product service, ta đặt tên là productServiceCircuitBreaker lưu ý tên này, là Id để xác định trong cấu hình của Gateway.
Trong gateway cấu hình ta thiết lập thuộc tính
.circuitBreaker(c -> c.setName("productServiceCircuitBreaker")
        .setFallbackUri("forward:/fallback/products")
)với fallback (giá trị trả về khi gặp lỗi) ta có thể thiết lập
@Bean
public RouterFunction<ServerResponse> fallbackRoutes() {
    return RouterFunctions.route()
            .GET("/fallback/products", request -> {
                Throwable error = request.attribute("org.springframework.cloud.gateway.support.ServerWebExchangeUtils.gatewayExecutionException")
                        .filter(Throwable.class::isInstance)
                        .map(Throwable.class::cast)
                        .orElse(null);

                String message = "Product service is currently unavailable";
                if (error != null) {
                    if (error instanceof org.springframework.web.server.ResponseStatusException statusEx) {
                        if (statusEx.getStatusCode().is5xxServerError()) {
                            message = "Product service failed with 5xx error";
                        } else if (statusEx.getStatusCode().is4xxClientError()) {
                            message = "Product service returned 4xx error";
                        }
                    }
                }
                return ServerResponse.ok().bodyValue(new FallbackResponse(message));
            })
            .build();
}rewrite path APIs
Để thực hiện việc rewrite path, trong cấu hình Gateway ta thiết lập như sau
cho authz-service
.route("authz-service", r -> r
    .path("/api/authz/token", "/api/authz/logout", "/api/authz/refresh-token", "/api/authz/signup")
    .filters(f -> f
            .rewritePath("/api/authz/(?<segment>token|logout|refresh-token|signup)", "/api/v1/${segment}")
    )
    .uri(authzEndpoint)
)với cấu hình trên khi gặp 4 paths "/api/authz/token", "/api/authz/logout", "/api/authz/refresh-token", "/api/authz/signup" nó sẽ rewrite thành /api/v1/ trước khi gửi vào authz service
hay như cho product ta có cấu hình cấu hình này thêm v1 vào endpoint
.rewritePath("/api/products(/.*)?", "/api/v1/products$1") Tổng kết
Gateway pattern là một pattern quan trọng khi triển khai ứng dụng theo mô hình microservices.
Tại Gateway ta có thể xử lý tập trung các vấn đề như(ratelimit, auth, rewrite,..) trước khi đưa request đến các service tương ứng, để mỗi service đứng sau gateway chỉ cần tập trung vào xử lý nghiệp vụ của riêng mình.
Bài viết này mình mới trình bày một số khía cạnh của Gateway trong Spring Boot, còn nhiều vấn đề nữa các bạn có thế tìm hiểu về bổ xung thêm cho ứng dụng của mình.

Để lại một bình luận