Tài liệu hóa RESTful APIs bằng việc sử dụng Swagger/OpenAPI

Anh em dev trong quá trình làm việc đều biết rằng tài liệu API mô tả việc kết nối giữa các hệ thống (be -> be, fe -> be) là rất quan trọng, Swagger/OpenAPI là một trong những đặc tả để mô tả kết nối được chấp nhận rộng rãi trong các công cụ test như Insomina, Postman và hỗ trợ rất đẩy đủ trong Java/Spring.
Vậy cách dùng nó như thế nào, mình giới thiệu nó sau đây.
Đặc tả Swgger/OpenAPI từ phiên bản 3.0 trở đi đã được đổi từ Swagger thành OpenAPI. Source code trong bài viết của mình có dùng cả 2 phiên bản 2.0 và 3.0 do vậy mình sử dụng
Swagger/OpenAPItrong tài liệu APIs.
Có hai cách tiếp cận để sử dụng Swagger/OpenAPI
- Viết tài liệu Swagger/OpenAPI sau đó mới implement code
- Implement code backend sẽ sinh ra tài liệu API
Viết tài liệu API trước
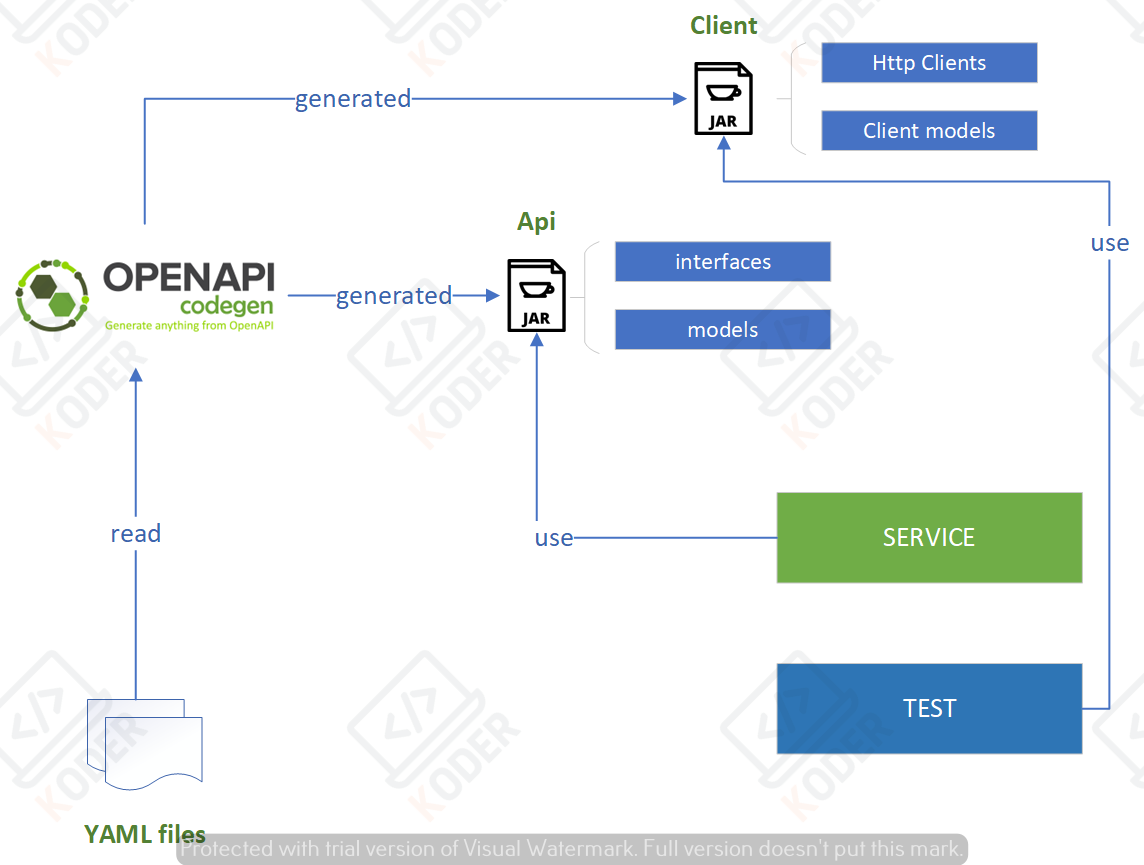
Trong một dự án cũ mình tham gia Product Owner có yêu cầu toàn bộ các thiết kế API cần được viết trước và được PM duyệt, sau khi thiết kế được duyệt code được đẩy lên CICD, nó sẽ buil thiết kế này và tạo thành các thư viện (jar files)
- client cho các bên khác sử dụng
- api cho service-impl (project implement thiết kế đó)
Như vậy toàn bộ dev cần thiết kế file Swagger/OpenAPI trước khi implement code
Mình có minh họa bằng hình vẽ dưới đây, và source code mình có public để các bạn có thể tham khảo (source này đang dùng swagger 2.0)

Ưu điểm của cách làm này là:
- Chốt được thiết kết API trước khi làm
- Khi cần thay đổi nghiệp vụ cần chỉnh sửa file thiết kế và các phần khác cần chỉnh sửa theo, không bị bỏ sót
- Từ file thiết kế sự dùng swagger-code-gen sẽ tạo cho chúng ta các file DTO, interface của RESTful API, và các HttpClients ta cần tập trung vào Implement logic của code
Vậy nó vận hành như thế nào, ta hãy xem qua cấu trúc của dự án
├── speedhome-api
│   ├── pom.xml
│   └── target
├── speedhome-client
│   ├── pom.xml
│   └── target
├── speedhome-service
│   ├── pom.xml
│   ├── src
│   └── target
└── yaml
    └── speedtest-apis.yaml
yaml là thư mục chứa đặc tả API viết theo định dạng Swagger 2.0, toàn bộ các file định nghĩa API sẽ được đặt vào đây.
Các tài liệu này được dev tạo ra, dev cần hiểu về cấu trúc của một file Swagger/OpenAPI, mình không giới thiệu trong bài viết, nhưng có một số điểm mà mọi người cần nắm được khi tìm hiểu về tài liệu Swagger/OpenAPI
- cách thể hiện các model dữ liệu
- các loại dữ liệu
- các validator đầu vào
- dữ liệu mẫu (phục vụ cho test ngay trên giao diện – try it out)
- thể hiện lỗi API
- mảng đối tượng
- tái sử dụng model
Khi nắm được cái nguyên lý cơ bản của YAML file, việc sử dụng AI để tạo tài liệu trở lên hiệu quả hơn rất nhiều, đôi khi dev cũng cần tinh chỉnh lại các YAML được tạo ra bởi AI.
Giả sử ta có 1 prompt sau cho AI tạo ra Swagger
create OpenAPI documnet for the product object with those fields: uuid, name, desc, price, rate. This document descibe CRUD for that object
đây là những gì ta nhận được
openapi: 3.0.1
info:
  title: Product API
  version: 1.0.0
  description: API for managing products with CRUD operations.

servers:
  - url: /products

paths:
  /:
    post:
      summary: Create a new product
      description: Creates a new product.
      requestBody:
        required: true
        content:
          application/json:
            schema:
              $ref: '#/components/schemas/Product'
      responses:
        '201':
          description: Product created
          content:
            application/json:
              schema:
                $ref: '#/components/schemas/Product'
        '400':
          description: Invalid input
          content:
            application/problem+json:
              schema:
                $ref: '#/components/schemas/ProblemDetail'
        '500':
          description: Internal server error
          content:
            application/problem+json:
              schema:
                $ref: '#/components/schemas/ProblemDetail'
    # removed some of spices code to reduce lenght of the article
components:
  schemas:
    Product:
      type: object
      properties:
        uuid:
          type: string
          format: uuid
          description: Unique identifier of the product
        name:
          type: string
          description: Name of the product
        desc:
          type: string
          description: Description of the product
        price:
          type: number
          format: double
          description: Price of the product
        rate:
          type: number
          format: float
          description: Rating of the product
      required:
        - uuid
        - name
        - price

    ProblemDetail:
      type: object
      properties:
        type:
          type: string
          format: uri
        title:
          type: string
        status:
          type: integer
        detail:
          type: string
        instance:
type: stringspeedhome-api là một sub-project (maven) tại đây nó được thiết lập để đọc file Swagger từ thư mục yaml, mọi người để ý đến cấu hình sau
<configuration>
    <inputSpec>${basedir}/../yaml/speedtest-apis.yaml</inputSpec>
    <language>spring</language>
    <apiPackage>com.speedhome.poc.api</apiPackage>
    <modelPackage>com.speedhome.poc.api.model</modelPackage>
    <invokerPackage>com.speedhome.poc.api.handler</invokerPackage>
    <configOptions>
        <useBeanValidation>true</useBeanValidation>
        <java8>true</java8>
        <interfaceOnly>true</interfaceOnly>
        <dateLibrary>java8</dateLibrary>
        <delegatePattern>false</delegatePattern>
        <useTags>true</useTags>
    </configOptions>
</configuration>
nó sẽ cấu hình package api (nơi chứa các java interfaces cho RESTful API được định nghĩa trong Swagger 2.0), package model nới chưa các request/response body
sau khi chạy lệnh mvn install trong sub-project speedhome-api nó sẽ generate code có cấu trúc như sau, trong thư mục target
├── PropertiesApi.java
└── model
    ├── Properties.java
    ├── Property.java
    ├── PropertyApproveReq.java
    └── PropertyReq.java
Như vậy bằng file Swagger nó đã định nghĩa giúp ta các ‘class cơ bản’, ta chỉ cần implement logic cho interface PropertiesApi tại -service project.
speedhome-client là một sub-project dùng sinh ra thư viện gọi đến RESTful API
nhưng nó mang ý nghĩa khác, nó sẽ tạo ra thư viện bao gồm các invoker class cho gọi đến API đã được định nghĩa trong Swagger. Đây là một thư viện hữu dụng, ta có thể dùng để
- tại
-serviceproject ta dùng trong phần test tích hợp khi phải gọi RESTful API để test - chia sẻ thư viện đến các dự án java khác, có thể dùng để gọi đến dự án
speedhome
Trong dự án này ta cũng chú ý đến đoạn cấu hình sau
<configuration>
    <inputSpec>${basedir}/../yaml/speedtest-apis.yaml</inputSpec>
    <language>java</language>
    <library>resttemplate</library>
    <apiPackage>com.speedhome.poc.client.api</apiPackage>
    <modelPackage>com.speedhome.poc.client.model</modelPackage>
    <invokerPackage>com.speedhome.poc.client.handler</invokerPackage>
    <generateApiTests>false</generateApiTests>
    <configOptions>
        <useBeanValidation>true</useBeanValidation>
        <java8>true</java8>
        <interfaceOnly>true</interfaceOnly>
        <dateLibrary>java8</dateLibrary>
        <delegatePattern>false</delegatePattern>
        <useTags>true</useTags>
    </configOptions>
</configuration>
api chứa các hàm tương ứng gọi đến RESTful API
invokerPackage là nơi chứa các handler, auth để implement cách gọi đến hàm đó
model các DTO cho APIs, có các trường tương ứng với Swagger file
Cấu trúc thư mục sinh ra như sau
├── api
│   └── PropertiesApi.java
├── handler
│   ├── ApiClient.java
│   ├── RFC3339DateFormat.java
│   └── auth
│       ├── ApiKeyAuth.java
│       ├── Authentication.java
│       ├── HttpBasicAuth.java
│       ├── OAuth.java
│       └── OAuthFlow.java
└── model
    ├── Properties.java
    ├── Property.java
    ├── PropertyApproveReq.java
    └── PropertyReq.java
speedhome-service đây là một sub-project nơi ta sẽ triển khai các implement cho các RESTful API
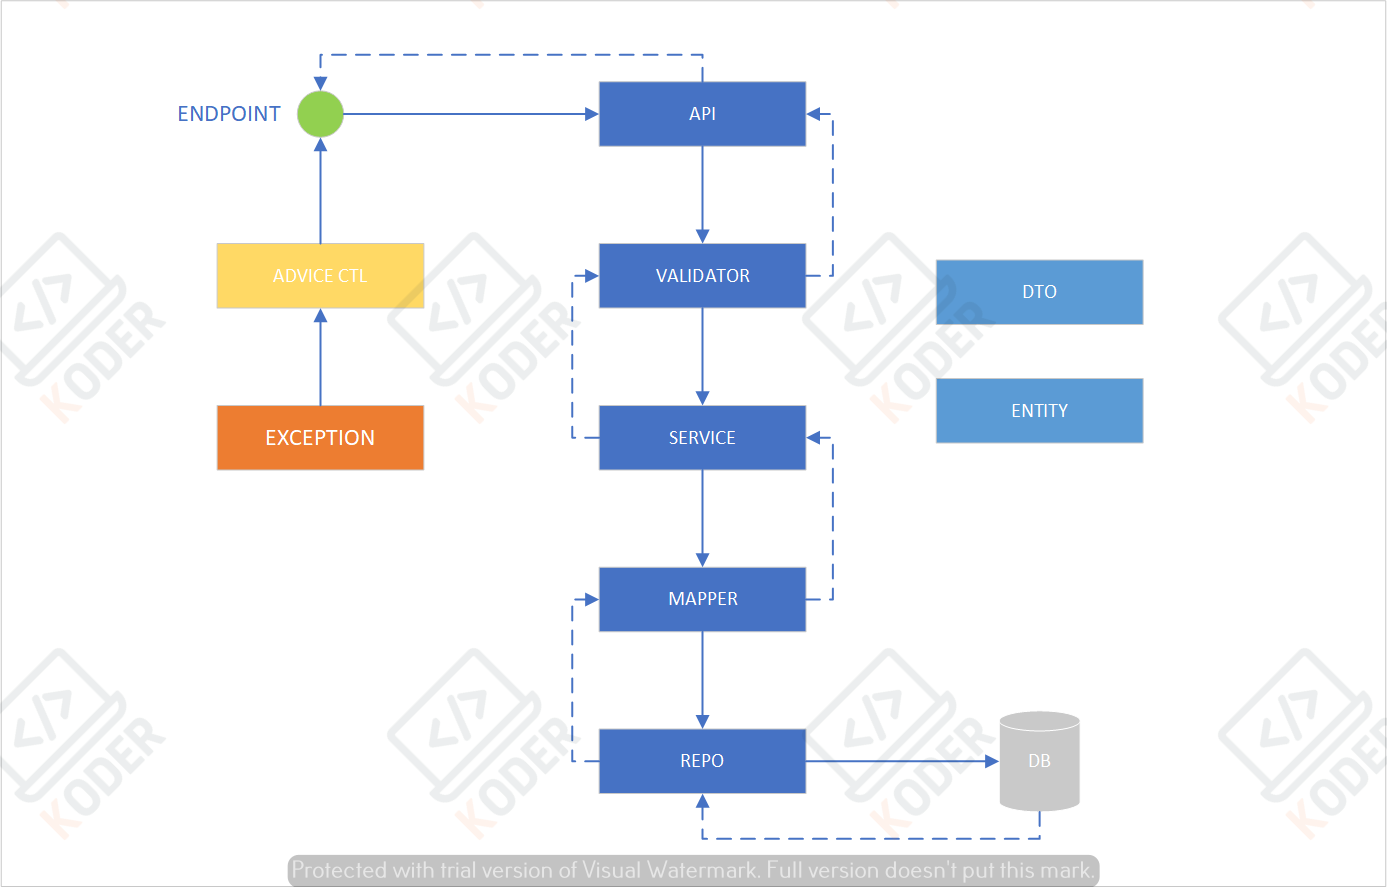
Dự án này sẽ import hai dự án -api và -client, việc implment tương tự như đã giới thiệu trong bài viết chia tầng cho ứng dụng và viêt các test case đã được giới thiệu qua bài viết áp dụng AI cho việc tạo test case
Đây là cấu trúc thư mục code của service
├── SpeedHomeApplication.java
├── api
├── config
├── entity
├── exception
├── filter
├── mapper
├── model
├── provider
├── repository
├── search
├── service
└── validator
Viết RESTful API xong nó sẽ tự tạo ra Swagger/OpenAPI document
Khi một dự án xây dựng RESTful API bằng Spring yêu cầu tài liệu đặc tả API cho dự án đó, các dễ dàng nhất là sử dụng thư viện springdoc-openapi-starter-webmvc-ui, nó sẽ hoạt động dựa trên cấu hình thưc mục chứa API (có thể là interface), nó sẽ quét và tạo ra các tài liệu tương ứng với các API được mô tả trong interface/inplement class.
Cách cấu hình như sau (Dự án này được thực hiện trên Spring Boot 3.5 và OpenAPI 3.0 bằng Gradle)
Cấu hình thư viện cần thiết build.gradle
Với dự án triển khai bằng Reactive sẽ có cấu hình khác, mình sẽ trình bày trong loạt bài về Reactive
implementation 'org.springdoc:springdoc-openapi-starter-webmvc-ui:2.8.9Cấu hình trong file YAML để chỉ định thông tin của tài liệu cũng như thư mục để quét API
springdoc:
  swagger-ui.path: /openapi/swagger-ui.html
  api-docs.path: /openapi/v3/api-docs
  packagesToScan: com.koder.course.applayered.api
  pathsToMatch: /**

api:
  common:
    version: 1.0.0
    title: Product APIs
    description: Description of the API...
    termsOfService: MY TERMS OF SERVICE
    license: MIT
    licenseUrl: MY LICENSE URL
    externalDocDesc: MY WIKI PAGE
    externalDocUrl: MY WIKI URL
    contact:
      name: Khoa Vu
      url: https://koder.vn
email: khoavd.it@gmail.comViết các annotation vào trong Java class để chi tiết tài liệu OpenAPI
Với sự hỗ trợ của AI thì việc viết Javadoc và các Annotaion cho Swagger thực sự trở lên đơn giản
Giả sử ta có interface như sau
@RequestMapping("/products")
public interface ProductApis {

    @PostMapping
    ResponseEntity<ProductResponse> createProduct(
            @RequestBody ProductRequest request
    );

    @GetMapping("/{uuid}")
    ResponseEntity<ProductResponse> getProduct(
            @PathVariable UUID uuid
    );

    @GetMapping
    ResponseEntity<List<ProductResponse>> getAllProducts();

    @PutMapping("/{uuid}")
    ResponseEntity<ProductResponse> updateProduct(
            @PathVariable UUID uuid,
            @RequestBody ProductRequest request
    );

    @DeleteMapping("/{uuid}")
    ResponseEntity<Void> deleteProduct(
            @PathVariable UUID uuid
    );
}Sau đó ta yêu cầu AI tạo tài liệu API bằng prompt /doc add Swagger annotation, use ProblemDetail to describe error case, đây là những gì ta nhận được
package com.koder.course.applayered.api;

import com.koder.course.applayered.dto.ProductRequest;
import com.koder.course.applayered.dto.ProductResponse;
import org.springframework.http.ProblemDetail;
import org.springframework.http.ResponseEntity;
import org.springframework.web.bind.annotation.*;

import java.util.List;
import java.util.UUID;
import io.swagger.v3.oas.annotations.Operation;
import io.swagger.v3.oas.annotations.Parameter;
import io.swagger.v3.oas.annotations.media.Content;
import io.swagger.v3.oas.annotations.media.Schema;
import io.swagger.v3.oas.annotations.responses.ApiResponse;
import io.swagger.v3.oas.annotations.responses.ApiResponses;
import io.swagger.v3.oas.annotations.tags.Tag;

@Tag(name = "Product APIs", description = "API for managing products. Provides endpoints to create, retrieve, update, and delete products.")
@RequestMapping("/products")
public interface ProductApis {

    /**
     * Creates a new product with the provided details.
     *
     * @param request the product details
     * @return the created product
     */
    @Operation(
            summary = "Create a new product",
            description = "Creates a new product with the provided details."
    )
    @ApiResponses(value = {
            @ApiResponse(responseCode = "201", description = "Product created",
                    content = @Content(schema = @Schema(implementation = ProductResponse.class))),
            @ApiResponse(responseCode = "400", description = "Invalid input",
                    content = @Content(schema = @Schema(implementation = ProblemDetail.class))),
            @ApiResponse(responseCode = "500", description = "Internal server error",
                    content = @Content(schema = @Schema(implementation = ProblemDetail.class)))
    })
    @PostMapping
    ResponseEntity<ProductResponse> createProduct(
            @RequestBody ProductRequest request
    );

    //REMOVED the rest of this file
}Xem tài liệu Swagger/OpenAPI
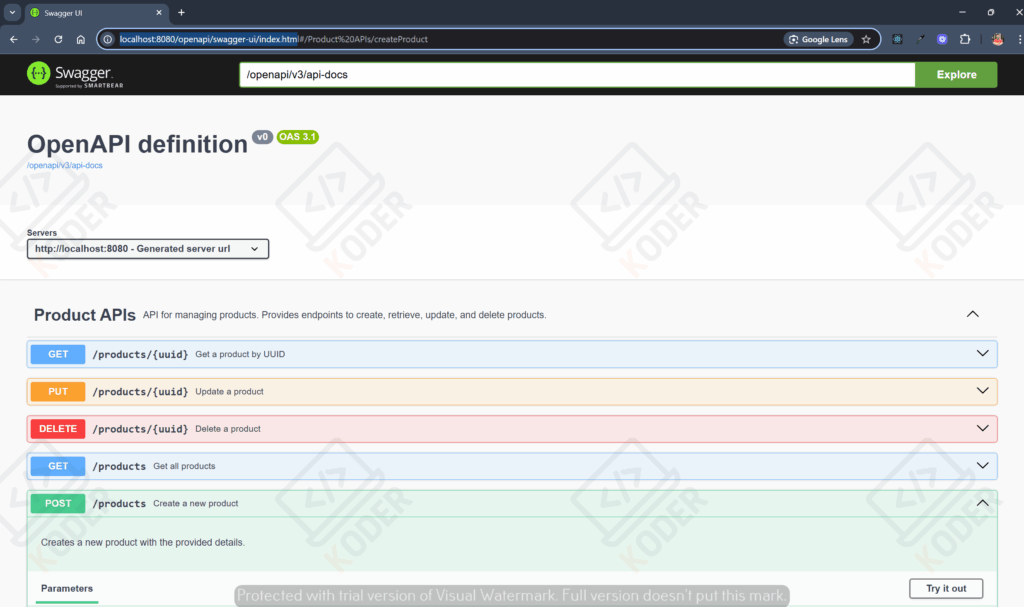
Trong phần cấu hình ta đã cấu hình tài liệu theo đường dẫn /openapi/swagger-ui.html vậy khi app khởi chạy ta có thể truy cập vào địa chỉ này

Ta có thể trực tiếp test các API trên màn hình này
Tổng kết
- Tài liệu RESTful API rất quan trọng khi làm việc tích hợp giữa các hệ thống cũng như làm việc backend và fontent
- Hai phương pháp tạo tài liệu trước khi implement và tài liệu tạo từ các interface sử dụng phương pháp nào thì tùy thuộc vào dự án
- Hiểu được cấu trúc của Swagger/OpenAPI (phần này mình không trình bày, mọi người tham khảo tại các nguồn khác) và sử dụng AI giúp việc viết tài liệu Swagger/OpenAPI trở lên hiệu quả hơn


Related Posts